Tag: marketing

Owning Your Media: Some Content Marketing Basics

By Sue Brady

Typewriter

Owned, Earned and Paid.

All three of these media types may play an important part in your marketing strategy. ‘Owned’ media refers to channels that you control such as your company Facebook page or blog. ‘Earned’ media is in essence word of mouth. When someone shares your content, that’s earned. ‘Bought’ is media you purchase, such as an ad or event sponsorship.

The focus of this article is content marketing for your Owned media.

What is content marketing?  Content marketing refers to published information designed to acquire, educate or engage prospects and customers. Content published in this way needs to be valuable to the reader and should be an integral part of your marketing strategy.  Content marketing is not a way to sell…at least not directly.  Rather, it’s a way to provide information that your prospects and customers will find useful.

How can you get started? First, clearly define your goals.  It’s not enough to just publish articles and blog posts. You need to understand what you hope to accomplish with your content. Is your goal to show that you are the thought leader in your field and therefore the place to go for specific types of information? Is your goal to educate your prospects about the capabilities of your products? Is it to dive into topics of interest to your target audience? Whatever you decide will drive how you go about choosing topics, writing about them, and ultimately publishing.

Your content marketing really breaks down into these main steps:

  1. Decide on a strategy to best meet your established goals (see above). To figure out your strategy, think about some basic things: What am I trying to solve for my customers? What type of content do they like to see? What’s my end game (what do I want to achieve)? Additionally, you should think about how you want to use your content. Are there multiple channels where you can use versions of the same content? This step should also include identifying where you want to post.
  2. Identify your audience. You need to know who you are writing for so that you can choose topics of interest.
  3. Decide how frequently you are going to post. This may not sound important, but if you want people to keep coming back, you need to keep your content fresh.
  4. Create an editorial calendar. Calendar-Clip-Art-FreeThis will help you to keep your content organized. There are templates available for no cost on the web. I use a simple spreadsheet with the dates down the sides and the following column headings: Article Title, published/not published, category, and keywords/tags. I try to schedule topics for myself as far out as possible so that I have a working list to guide my efforts.
  5. Start writing. This sounds easy but of course is not. There are a number of steps involved with the actual writing
    1. Generate topic ideas (here are 6 Goldmines for finding relevant topics). In addition to those 6 goldmines, make sure to take a peak at what your competition is writing about to see if their topics make sense for you too.
    2. Consider SEO in your writing.
      1. SEO (search engine optimization) is important for search engines like Google to be able to find you in their searches. Do some research to figure out what terms your prospective customers are searching on and make sure you include those words in your article. You don’t want to overdo it, but you want to make sure your content is found.
      2. Note that Google+ is also important for SEO. While Google+ is unproven as a means to gain customers, Google itself considers Google+ presence when ranking content. So open up a Google+ account and post your content there. It’s free and can only help with your rankings.
      3. Once you’ve created your account, make sure Google knows who you are. You do this through Google Authorship and it’s how Google knows to start looking for you when someone searches on relevant terms. You can do that here. Doing this also means that when you do show up in a search, your name will be visible in the listing.
    3. Create an outline for the article. To be honest, I don’t always put this to paper, but I always have an idea, at least in my head, of how I want a post to flow.
    4. After you write your post, go back over it carefully to delete redundancies, fix grammatical errors, and in general tighten it up.
  6. Respond to comments. Once you’ve published an article, check your post for reader comments and respond to them. It’s a great way to engage with your readers and help them to feel a personal connection.

Don’t be afraid to publish that first article. The first time is always the hardest.

After Setup: Focus on LinkedIn

By Sue Brady linkedin logo

Part 2 in the continuing series of post set-up basics for Social Media (read part 1 – Twitter Basics here)

Congratulations! You’ve set up your LinkedIn company page. Now you need to make the most of it.  LinkedIn currently boasts almost 260 million users and remains one of the most actively used social media tools. It is viewed as a Business-to-Business (B2B) tool and not necessarily a personally social one.

As always, the first thing you need to clarify is your company’s LinkedIn goal so that you can make sure you are doing all you can to achieve it.

Possible Goals

  • To have a place for seekers to learn about your company and/or products
  • To offer advice (aka thought leadership) to potential customers
  • To recruit new employees
  • To generate leads/sell product.

Visitors will come to your LinkedIn page because

  • They read a tweet from your company
  • They read an article where your company is mentioned
  • They saw your logo as the employer (or former employer) of someone they want to do business with or someone they know
  • They are interested in a job posting associated with your company
  • They heard about your company and want to gather some additional information.

In support of almost any LinkedIn goal, you’ll need to have a built out profile. It supports everything you’ll do on LinkedIn. Let’s say someone sees a tweet from your company, or reads an article about you or someone at your company. A first stop for many folks is LinkedIn because they can see what your company is all about at a glance and, they can easily see if they know anyone in their network that works there. So your profile is key and should be the first thing you focus on by adding information to your home page. You can include things like: address, date you were founded, website, company size, industry etc.

Also flesh out your Product/Services tab and list as much as you can to make it clear to viewers what your company does. And you’ll want to ask others to leave reviews of your products and services as a way to add more credibility to your page.

Once your page is as good as you can make it, you want to make yourself known.

Build a following

  • Invite your personal contacts to follow your page
  • Invite your business contacts to follow your page
  • Invite your customers to follow your page
  • Follow your customers’ business pages; a company may see your ‘follow’ and follow you back
  • Find appropriate LinkedIn groups to join on behalf of your company so that you can start participating in conversations there. It’s a great way to connect with others.

Share content

  • Share relevant content posted by others (companies and people) in your network
  • Share articles you have found that are relevant to your audience
  • Share blog posts you’ve written on your company site that your audience will find relevant
  • Post updates about what’s happening in your company
  • Answer questions that are posed to your company either directly or in a related group.

Comcast Post

This picture shows a post made by Comcast Business Class that was also posted by an employee there. It is showing in my feed twice because I follow Comcast Business Class and I am also linked in with Craig. Using the options along the bottom of the post, I can like the article, leave a comment or share this article with my network.

Decide how frequently you want to post. Many companies keep an editorial calendar to inform content for all of their social media efforts. It’s a best practice and will help you keep it all straight, especially as you look to cross-post across your various sites.

Another way to reach potential customers is through LinkedIn advertising. You can target your ads based on your own requirements for the type of customer you want to attract. These might be a particular industry, job title, geography, or company size. Note that you might want to make your targeting ‘loose’ enough so that your ad is seen by a larger audience.

To buy an ad, you need to go here: LinkedIn Ads. You’ll be walked through the steps, starting with deciding between creating an ad vs sponsoring one of your updates. You can see an example of a post sponsored by Yahoo below. You’ll be prompted to set the minimum you are willing to pay for a click, as well as a daily budget. This is a great, easy-to-follow article that walks you through each of the steps from identifying your audience to analyzing your results: Tutorial for Advertising on LinkedIn.

Linkedin Promoted Ad

Not only does advertising reach new potential customers, but you might get a benefit from existing customers. In the example below, the customer made a comment on the company’s post, and that means his network will now see that ad. In addition, the company used it as a way to politely ask for a recommendation on their product page.

Linkedin Ad

Regularly check your LinkedIn page to see if anyone has sent you a message or commented on something you’ve posted (and/or use your settings to receive notifications via email). It’s usually a good idea to post a response if someone comments publicly on something you’ve posted. And of course, you should always answer a private message, and do so privately. Private message notifications show up at the top of your page on the right hand side: notificationsNext week’s article will cover the Post-setup Basics for Facebook for your Business. If you missed last week’s Twitter Basics post, you can read that here.

How to set up Twitter, LinkedIn, and Facebook for Your Business in a few Easy Steps

By Sue Brady

social media montageSetting up social media pages  for your business can be intimidating. But it’s easier than you might think. I’ve consolidated the steps here for Twitter, LinkedIn and Facebook. The hard work begins once your pages are setup. Check back for an upcoming post on What Comes After the Set-up: Making the Most of Your Social Media.

Twitter Twitter

Signing up with Twitter is the most straightforward of the three services covered in this post.

Step 1: Go here https://twitter.com/
Step 2: Fill out this box. Since you are setting this up for your business, you may want to use a different name and email than you use personally – see below for recommendations on doing this on LinkedIn and Facebook.

Click the button to ‘Sign up for Twitter.’

Twitter sign on page

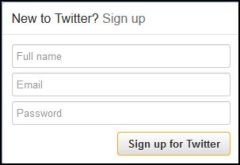
Step 3: Pick a user name when prompted. Others will see this when they follow you so make sure it’s suitable. It’s most common to use your company name. Caps show, so be sure to use them in the right places.
Step 4: Click on ‘create my account’ and you’ll have an account!
Step 5: Twitter will walk you through some next steps. Skip anything you don’t want to do, but the basic idea is to find others to follow. Doing so, as well as ‘tweeting,’ will help you build your own following. Twitter will make suggestions for you regarding others you may want to follow based on the people you’ve chosen to follow over time.
Step 6: From the Home page, click on the gear in the top right-hand corner and then select ‘Settings.’ Make sure your time zone is correct. Look at the content settings and select anything that applies to you.

Twitter Gear

Step 7: Click on the same gear mentioned above, but choose to ‘Edit profile.’ From there you can upload your company logo. This will be shown next to your tweets, so be sure you use something that’s recognizable in the small square space allowed. Ideal pixel size is 200×200 to 500×500 with a 4MB max. You may be prompted to crop your image because there isn’t a lot of space. When you are satisfied, click save.
Step 8: Upload a header image (also available in the ‘Edit profile’ section). Recommended dimensions are 1252×626 pixels with a max file size of 5MB. This image will be visible when someone visits your profile.
Step 9: More settings. From the same ‘Edit profile’ section you can enter your location, your web address and a brief description of what your company does (you can only use 160 characters to do this). Fill this out if your goal is to have people find you! You can also connect to Facebook so that your tweets are automatically posted to your business Facebook page.
Step 10: Save changes and start tweeting! Remember, tweets can only be 140 characters in total.

linkedin LinkedIn

The only way to have a LinkedIn company page is by having a personal LinkedIn page first. That means that if someone from your company is responsible for making changes to that page, they have to be able to log into your personal LinkedIn account if that’s the account you’ve used to set up your business account. To get around this requirement, you can open another LinkedIn account as a person from your company for instance, and then create a business page from there.

Before you get started, create a new email address to use for this purpose. To make it easy to remember, you can use something like: linkedin@yourcompany.com where ‘yourcompany’ is your actual company name. If you don’t have your own company email domain name, you can open up a free gmail (visit www.gmail.com) or yahoo mail account (visit www.Yahoo.com). It has to be a real email account because LinkedIn will use it to verify your new account.

Step 1: Sign up for a LinkedIn account here: www.linkedin.com using your new email address and a person’s name to be associated with your account (it’s okay to use a generic name). You’ll be prompted through a number of screens designed to help you find others to link in to, follow etc.  Skip the steps to find people you know since the only reason you have the personal account is to enable your business account.
Step 2: Once Step 1 is completed, you can add a business account. You’ll see five navigation areas across the top of your home page.
linkedin nav bar
(Click on above image to enlarge.)

Move your mouse over Interests and choose ‘Companies.’ Once there, click on the link for ‘Add a Company.’
Linkedin Add Company
(Click on above image to enlarge.)

Step 3: Fill out the requested information, and click ‘continue.’
Step 4: Linkedin will send an email to the address you provided, and ask you to verify that email. Check your email and click as instructed.
Step 5:  Complete your profile.  Once you’ve verified your account, fill out your profile. Make sure to write an About section that describes what it is you do. Also take the time to add Products/Services in the appropriate sections. Include links to your website or to specific products.
Step 6: Upload a nice photo to the top of your company page. The minimum pixel size is 646×220 and the maximum file size is 2MB. You can (and should) also upload a corporate logo. Size is restricted though, and many businesses use a square shaped logo that can be used in other social media too. A square works best for updates that you’ll post on behalf of your company. If you want to use a standard logo, the minimum pixel size is 100×60. A square logo has a minimum pixel size of 50×50.  All photos/logos must be a png, jpeg or gif and there is a 2MB size limit. Your logo also will automatically appear in any employee’s profile where your company is listed as an employer, and square logos definitely render better in that area.

To upload or edit a photo to your Company Page, follow these steps:

  1. From your company homepage, find the edit button near the photo.
  2. Choose ‘Browse’ to find the image on your computer that you want to upload. You can also change or edit an already uploaded picture from here.
  3. Click Upload and click Save.
  4. Click Publish in the top right of the page.

FacebookFacebook

Similar to LinkedIn, this one requires a bit more work on the front end. While you can set up a stand-alone business page, it’s much better to have your Facebook business page associated with a personal account. It gives you far more flexibility and functionality than if you set up a business account on its own. A lot has been written on this topic because most people don’t want to link a business account to their own personal account. There is an easy workaround:

Step 1: Create a new personal Facebook account. Similar to the instructions for LinkedIn above, you’ll need to use a different name and email address from the one on your current personal Facebook account. Before you get started, create a new email address that you’ll use for this purpose. To make it easy to remember, you can use something like: facebook@yourcompany.com where ‘yourcompany’ is your actual company name. If you don’t have your own company email domain name, you can open up a free gmail (visit www.gmail.com) or yahoo mail account (visit www.Yahoo.com). It has to be a real email account because Facebook will use it to verify your new account.  Once you have an email account, choose a name, different from your own, to create the account.

Facebook Sign Up
Step 2: Do not follow the Facebook prompts to invite friends or do other things. Find the cog in the top right-hand side of your page, and use the drop down to reach privacy settings. Choose the highest level of privacy for each item. Your goal is not to have this account ‘found’ by friends. It’s merely a means to gaining a business account (there is no reason that anyone will ever find that page as the association to your business page is not public).
Step 3: While logged into your new account, go here https://www.facebook.com/pages/create.php. Click on the type of business you are setting up: Local Business, Company/Organization/Institution etc. and then choose a category from the drop down.  Add a short descriptor for your business when prompted. You can always change this later if you think you’ve made an incorrect decision and you can also add a longer descriptor later (see step 5). (Note: To make sure you are making changes to your company page, you can click the gear on the top right of your page and switch between the personal account and the business account.)

FB switching pages
Step 4: Upload a cover photo for your page. You’ll see the button to do that on the Admin Panel about halfway down the page This will be seen at the top of your page. Your image can contain text but the text cannot represent more than 20% of the image space. The optimal file size is 851×315 pixels. Facebook recommends using a jpg that’s less than 100kbs and has sRGB resolution. sRGB resolution is very high quality, but it isn’t necessary if you don’t have a photo in that format. You will also need to upload a smaller profile pic to appear as a square to the left of the cover image. File size is 160×160 pixels. This smaller image is the one that will appear next to any of the posts you write for your page. Facebook will ask if you want to ‘Choose from Photos’ or ‘Upload Photo.’ Because you have no photos on your business page to choose from, you’ll have to upload a photo from your computer.

Step 5: Update your Information by clicking on this button: FB Update Info Button

The information you fill out here will appear when someone clicks on the ‘About’ link on your page. This is an important tab because not only do you have room to say great things about your product, but it’s also indexed by Google. If there are certain keywords that are important to you, make sure you include them in your copy.  If you include an address, Facebook automatically adds a map locating your business.
Step 6: Customize the ‘favorites boxes’ as appropriate for your business.  Only four will display without the user clicking on the drop down list, and you can adjust which ones you want to show. Companies use these to include pages for testimonials, customer service, job openings and the like.

Before you start inviting people to ‘like’ or visit your page you want to have some activity showing already, so keep it quiet until you’ve posted a few status updates.

Good luck and don’t forget to come back over the next few weeks for posts on ‘What Comes After the Set-up: Making the Most of Your Social Media’ for each of the three services covered here.

How ‘Breaking Bad’ can Help You be a Better Marketer – Special Post (CAUTION: SPOILERS!!)

By Sue Brady

What a great series Breaking Bad was. Vince Gilligan is genius. Basking in the after-glow of such a great season finale made me consider the marketing lessons that could be learned from Vince, Walt and the gang.

And so I bring you my 10 top Breaking Bad Marketing Lessons:

  1. Know your customer and give them what they want. Vince Gilligan’s customers were his viewing audience, and he couldn’t have delivered a better product. Lydia’s customers wanted purity and when she could deliver, they would pay top dollar.
  2. Understand your competition, and make sure your product is better. This will create demand for your product. Deliver quality, always. If your product slips, your buyers will not be happy. Gus sized up the competition and exploited the Mexican Cartel’s weaknesses for his own gain.
  3. Make sure your product has a unique selling proposition to drive its success. Walt’s was product purity. What’s yours?
  4. Don’t let emotion drive your strategy. Todd let emotion drive his desire to continue doing business with Lydia, and in the end that was his downfall.  Clearly Walt’s ego was his downfall, right down to his final realization that he was doing ‘all this’ for himself, not his family.
  5. Take pride in and promote your brand with consistency. Have an A-1 Day!
  6. Learn from your mistakes. Walt and Jesse first tried to enter the drug trade using three of Jesse’s non-professional pals. Quickly they realized that their operation could be more sophisticated and profitable, so they moved onto bigger game.
  7. Always have a plan and be prepared to adjust. Gus and Walt always had plans, and anticipated what might happen. They also had contingency plans that they were not afraid to execute. Some plans can be implemented flawlessly, but most require adjustments along the way.
  8. Know what’s important and focus your energy there.  Walt focused on two things: Purity of the cook and the payoff. He could control the purity so that became routine for him. And his battle to control his payoff became the crux of almost every action he took.
  9. Try new things (test, test, test), but make sure you control your environment. Environmental control was key in Walt’s lab (remember the fly episode), just as controlling outside factors is key in any marketing test.
  10. Love your job. “I liked it. I was good at it. And I was really—I was alive.” Walter White

“Buy the RV. We start tomorrow.”